In today's homes, reading lamps play a vital role in creating a comfortable environment. Understanding how to fix a dimming switch on a reading lamp can enhance this experience. According to recent data from the Lighting Research Center, around 70% of ergonomic reading setups rely on adjustable lighting to improve focus and reduce eye strain.
Expert electrician Julia Marks emphasizes, "A well-functioning dimming switch not only adds convenience but also extends the life of your bulb." However, many users neglect the maintenance of these switches. Issues like flickering or unresponsiveness can disrupt your reading experience.
When faced with problems, identifying the cause is key. It might be a simple wiring issue or a faulty switch. As the industry continues to evolve, knowing how to fix a dimming switch on a reading lamp becomes essential for both practicality and sustainability. Engaging with expert advice can lead to longer-lasting solutions.
When dealing with a malfunctioning dimming switch on your reading lamp, identifying the symptoms is crucial. A dimming switch may not respond at all, or it could lead to flickering lights. Sometimes, it’s just a matter of inconsistent light levels. Understanding these issues helps you decide on the best course of action.
Notice if the light flickers when you adjust the switch. This could indicate faulty wiring or a worn-out switch. If the lamp only works at certain positions of the dimmer, it suggests wear and tear. Faded light is another symptom that shouldn't be overlooked. As you troubleshoot, observe whether these symptoms persist or change.
Tips: Regularly check your reading lamp for signs of malfunction. A simple visual inspection can save you time. If you notice dimming issues, consider replacing the switch before further damage occurs. Always ensure the lamp is unplugged when conducting any repairs. This step is vital for your safety. When in doubt, consult a professional to avoid unexpected electrical problems.
When preparing to fix a dimming switch on your reading lamp, gathering the right tools is essential. You will need a multimeter to check the voltage. A screwdriver set will help open the lamp casing. Having a soldering iron on hand is crucial if you need to replace any wiring. These tools allow for a thorough examination of the electrical systems within the lamp.
In addition to tools, gather materials to assist in the repair. A roll of electrical tape can fix any exposed wiring quickly. Having replacement switches or potentiometers handy will make repairs smoother. If you are inexperienced with electrical work, consider obtaining a safety manual. Reading basic electrical safety tips cannot be overlooked. Reflecting on your past experiences can help inform your current approach as well. Engage with detailed guides or videos to enhance your understanding.
Disassembling your reading lamp can be a straightforward task with the right approach. Start by unplugging the lamp to ensure safety. Carefully inspect the base, where you will find screws or clips. Use a screwdriver to remove these securements. It’s fascinating how often these small parts hold everything together. Once loose, gently pull the base apart. Avoid using excessive force; this can damage the wires inside.
Next, examine the dimming switch. You might see dust or debris that has accumulated over time. A small brush can help you clean the area effectively. When you locate the dimmer, check for any obvious signs of wear or corrosion on the contacts. Often, these are the culprits behind malfunction. Take photographs during each step. This visual guide will help you during reassembly.
Revisiting your disassembly ensures no essential part is overlooked. Many overlook small details that can lead to problems later. While reassembling, make sure each component clicks securely back into place. Tighten screws gently; a common error is overtightening, which can damage plastic parts. Take your time, reflect on what you've learned, and appreciate the intricate design of your lamp. Each disassembly offers a chance to understand your lamp better.
When diagnosing a dimming switch on your reading lamp, electrical issues are often the culprit. Start by ensuring the lamp is unplugged. This is crucial for safety.
Carefully inspect the dimming switch for any visible damage. Frayed wires or burn marks could indicate a problem that requires immediate attention.
Testing the switch is straightforward. Use a multimeter to check for continuity. If the multimeter shows no continuity, the switch may need replacement. Remember, even minor issues can lead to larger problems down the line.
Pay attention to fluctuating brightness as it might signal a deeper electrical fault.
Tips: Regularly clean the switch and surrounding area. Dust buildup can affect performance. Additionally, check the lamp bulb. A faulty bulb can mimic dimming issues. Experiment with different bulbs to see if the problem persists.
Document your findings. This can help if you need professional advice later. Safety is paramount, so don't hesitate to consult an expert if you're uncertain.
Reassembling your lamp after fixing the dimming switch is a crucial step.
Carefully inspect each component. Make sure wires are properly aligned.
A loose connection can lead to failure.
Use a multimeter to check continuity, ensuring all connections are secure. If something feels off,
re-evaluate your work. It’s not uncommon to make mistakes.
Once the lamp is reassembled, conduct final testing.
Plug it in and turn on the switch. Observe how the lamp responds to adjustments.
If it dims smoothly, that's a good sign. If it flickers or fails to dim, further investigation is needed.
Sometimes, small issues can be overlooked during repairs.
Double-check the dimming switch and connections again. Remember, every detail matters.
Taking time to reflect on the process is key. Ask yourself what worked well and what didn’t.
Documenting these thoughts can help with future projects. Fixing a lamp may seem simple,
but it requires attention and precision. It’s about learning and improving each time.
Don’t hesitate to revisit your method; it’s part of becoming proficient.
: Flickering lights, no response, and inconsistent light levels are common symptoms.
If the light flickers during adjustment, there may be faulty wiring or a worn switch.
This likely indicates wear and tear. Consider replacing the dimming switch.
Faded light or flickering should not be overlooked and indicates potential malfunction.
Always unplug the lamp before starting any repairs to avoid electrical accidents.
Dust or debris can accumulate and affect the functionality of the switch.
Make sure each component clicks securely in place and avoid overtightening screws.
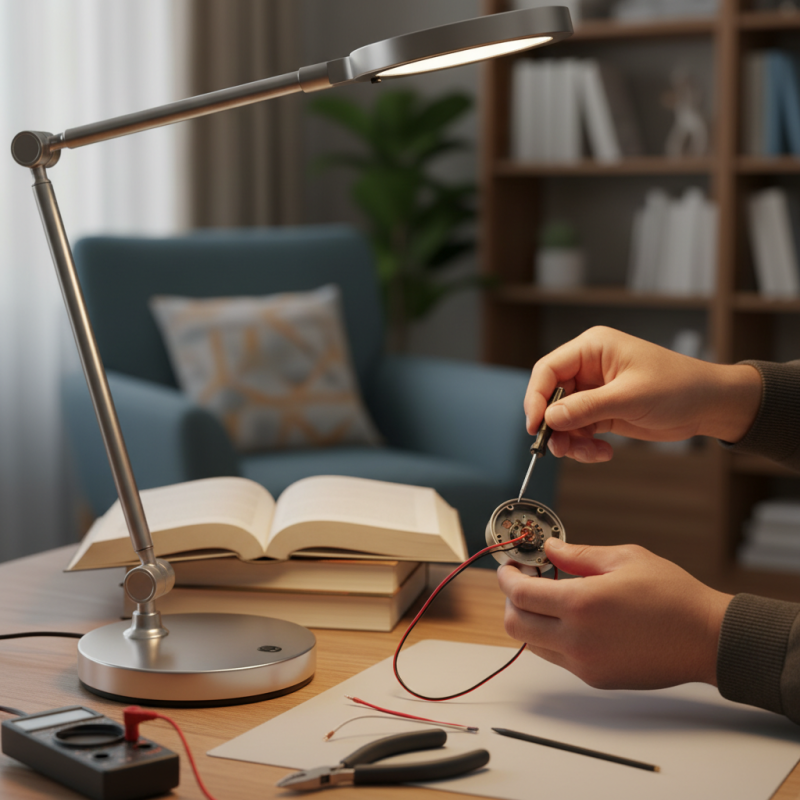
Take photographs at each step to help with reassembly later.
If you doubt your ability, consulting a professional can prevent further issues.
Each disassembly is a chance to learn about your lamp's design and functionality.
In the article titled "Top 10 Ways to Fix a Dimming Switch on Your Reading Lamp," essential steps are provided to help users troubleshoot and repair a malfunctioning dimming switch. The first step involves identifying the symptoms of a faulty switch, which can include flickering lights or inconsistent brightness levels. Once the problems are recognized, the necessary tools and materials for the repair process should be gathered.
The article then outlines a step-by-step guide on how to disassemble the reading lamp safely. After accessing the internal components, users will learn how to test the dimming switch for potential electrical issues that may be causing the malfunction. Finally, the article describes the process of reassembling the lamp and performing a final test of the dimming switch to ensure it operates smoothly. This comprehensive guide effectively answers the question, "How to fix a dimming switch on a reading lamp?" guiding readers through a straightforward repair process.
LuxPower Light